Employee database
Laboratory work #3 “Employee database”
The progress of the Laboratory work #3 and explanation for the course
As you develop the Employee database for the “ABC ltd.” Company, you will learn more about the details of the design steps and how to use Access 2003-2010 to create a well-designed and accurate database.
An Access database is made up of several types of objects, such as a table or report, consisting of many elements. An object is a database component that can be created, selected, and manipulated as a unit. The basic database objects are described below.
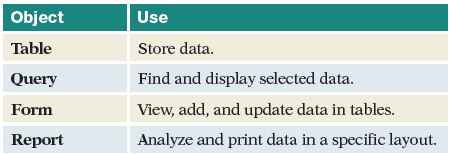
The table object is the basic unit of a database and must be created first, before any other types of objects are created. Access displays each different type of object in its own window. You can open multiple objects from the same database file in the work area; however, you cannot open more than one database file at a time in a single instance of Access. To open a second database file, you need to start another instance of Access and open the database file in it.
Creating a Table
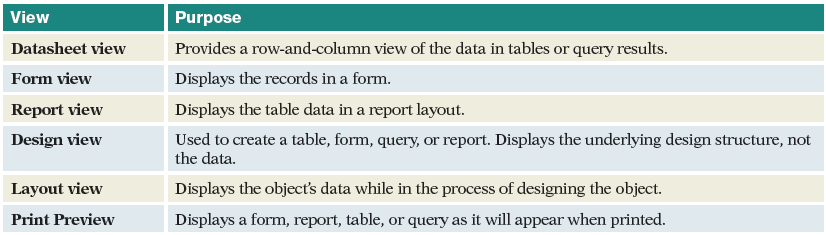
In anticipation of your entering information in the table, Access displays the blank table in Datasheet view, one of several different window formats, called views, that are used to display and work with the objects in a database. Each view includes its own Ribbon tab that contains commands that are designed to work with the object in that view. The available views change according to the type of object you are using. For example, when working with reports the available views are report view, print preview, layout view, and design view; yet when working with datasheets the viewing options are design view and datasheet view. The basic views are described in the following table.
Datasheet view is a visual representation of the data that is contained in a database table. It consists of a grid of rows and columns that is used to display each field of a table in a column and each record in a row. The field names are displayed in the header row at the top of the datasheet.
Below the header row is a blank row. The intersection of the row and column creates a cell where you will enter the data for the record. The square to the left of each row is the Select Record button and is used to select an entire record. The record containing the insertion point is the current record and is identified by the color in the Select Record button. The * in the Select Record button signifies the end of the table or where a new record can be entered.
The bottom of the work area displays a Current Record box and record navigation buttons. The Current Record box shows the number of the current record as well as the total number of records in the table. Because the table does not yet contain records, the indicator displays “Record: 1 of 1” in anticipation of your first entry. On both sides of the record number are the record navigation buttons, which are used to move through records with a mouse. In addition, two buttons that are used to filter and search for data in a table are displayed. You will learn about using all these features throughout the text.
Additional Information: Entering information in Datasheet view is very similar to working in a Microsoft Excel worksheet.
Defining Table fields
Now you are ready to begin defining the fields for the table. You have already decided that the main table in this database will include the employee’s basic information such as employee number, name, birth date, and address. Next, you need to determine what information you want to appear in each column (field) about the subject recorded in the table. For example, you know you want to include the employee’s name. However, should the entire name be in a single column or should it appear as two separate columns: first name and last name? Because you may want to sort or search for information based on the employee’s name, it is better to store the information in separate columns.
Similarly, because the address actually consists of four separate parts – address, city, state, and zip code – it makes sense to store them in separate columns as well.
Generally, when deciding how to store information about a subject in a table, break down the information into its smallest logical parts. If you combine more than one kind of information in a field, it is difficult to retrieve individual facts later.
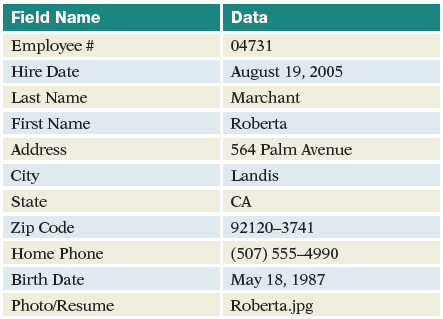
After looking at the information currently maintained in the personnel folder for each employee, you have decided to include the following fields in the table: Employee # (ID), Hire Date, Last Name, First Name, Address, City, State, Zip Code, Home Phone, Birth Date, and Photo. The data for the first employee record you will enter is shown below.
Entering field data
Notice that the first field in the table, ID, is already defined. The ID field is always included in a table when it is first created. It automatically assigns a number to each record as it is added to a table and is useful for maintaining record order. The second column header displays Click to Add and is used to add a new field in the table.
In Datasheet view, you can enter data for a record and create a new field at the same time. The first field of data you will enter is the employee number, which is assigned to each employee when hired. Each new employee is given the next consecutive number, so that no two employees can have the same number. Each number is a maximum of five digits.
When you enter data in a record, it should be entered accurately and consistently. The data you enter in a field should be typed exactly as you want it to appear. This is important because any printouts of the data will display the information exactly as entered. It is also important to enter data in a consistent form. For example, if you decide to abbreviate the word “Avenue” as “Ave.” in the Address field, then it should be abbreviated the same way in every record where it appears. Also be careful not to enter a blank space before or after a field entry. This can cause problems when using the table to locate information.
In case of Trouble: For more information on moving through, entering, and editing text, refer to the section Entering and Editing Text in the Introduction to Microsoft Office 2003/2010.
The employee number for the first record is entered in the table and Access is ready for you to enter the data for the next field. However, notice the leading zero is no longer displayed in the employee number you just typed. You will learn the reason for this and how to correct it shortly.
The new field has been assigned the default field name of Field1. Also notice that the ID field displays the number 1 for the first record entered in the table.
Changing field names
Before entering more data, you want to replace the default field name with a more descriptive field name. A field name is used to identify the data stored in the field. A field name should describe the contents of the data to be entered in the field. It can be up to 64 characters long and can consist of letters, numbers, spaces, and special characters, except a period, an exclamation point, an grave accent (`), or brackets ([ ]). You also cannot start a field name with a space. It is best to use short field names to make the tables easier to manage.
The highlighted text is deleted and replaced by the new field name you typed. You realize that “Employee ID” is the more common term used on company forms, so you decide to use this as the field name instead. As you enter text, you are bound to make typing errors that need to be corrected. You also may want to edit or update information. In this case, you want to edit the field name you are currently working on. The insertion point is already in the correct position and you just need to delete the character to the left of it.
The field name has been completed, and it is now easy to know what the data in that column represents.
Defining field data type
As you noticed, the leading zero of the Employee ID number has been dropped. This is because Access automatically detects and assigns a data type to each field based upon the data that is entered. In this case, the field entry consisted of numbers only, and Access assigned the field a Number data type. This data type drops any leading zeros.
Data Type
The data type defines the type of data the field will contain. Access uses the data type to ensure that the right kind of data is entered in a field. It is important to choose the right data type for a field before you start entering data in the table. You can change a data type after the field contains data, but if the data types are not compatible, such as a text entry in a field whose data type accepts numbers only, you may lose data. The data types are described in the following table.
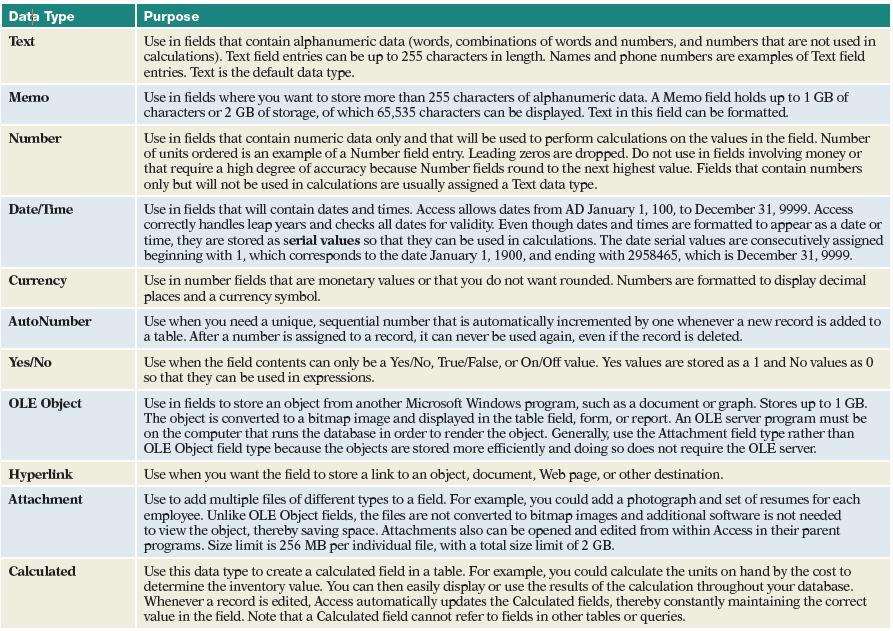
For reference. OLE is abbreviation for Object Linking and Embedding: OLE is software technology developed by Microsoft Corp. in 1990 and converted into ActiveX technology in 1996.
*************************************************
The Task #1. Designing the data spreadsheets (Data Tables).
Let us know some information about employees of the company. Imagine that we have certain information on each of the company staff: Surname, Name, (Name#2); Date and Year of birth of the person; his Address; Department in which he works (the employee’s work location), the employee Number, his Position (the employee’s job title), his Salary (or the employee’s pay rate); his Education and work Experience; his photography and other additional information about the employee.
So, one has to design a data container – i.e. a database in the form of a table, and it should be noted that the proper information on established posts and Departments of the Company is stored in appropriate database directories – in the Directory of Departments and the Directory of Staff positions.
In order to create a table "The Directory of Staff positions" one has to:
- choose inset (a tab) Table view New in the main Database Window, and additionally click Design mode;
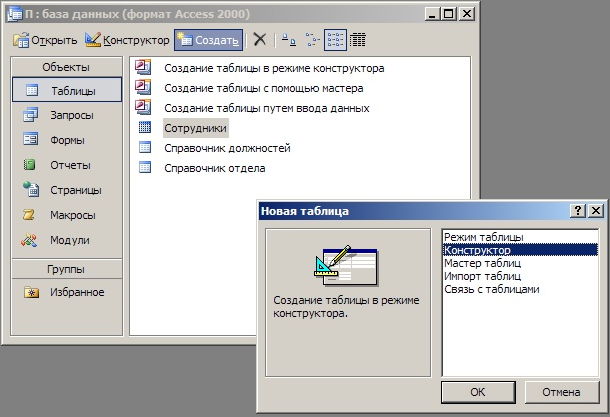
Figure #1
- enter the following structure (fill it up) according to the proposed table (see Figure #2):
|
Имя поля
|
Data Type
|
Field Properties
|
Value
|
|
the Code of Positions
|
Number
|
Field Size
|
Integer
|
|
|
|
Indexed
|
Yes (No Duplicates)
|
|
Position Title
|
Text
|
Field Size
|
30
|
|
Salary
|
Currency
|
Format
Number of decimal places
|
Fixed
2
|
Note. The Code of Position field should be made as “key field” with Primary Key marker in the Table. In order to realize it one has to highlight the cell and press the button  Primary Key in the toolbar.
- Close the Design view window and rename the table as "the Handbook of Positions".

Figure #2: окно Конструктора таблиц. Структура таблицы «Справочник должностей».
After completion of the table structure it must be filled with proper data. To do this, click the Open button and enter the data. Foe example:
|
Код должности
|
Наименование должности
|
|
1
|
Директор
|
|
2
|
Гл. бухгалтер
|
|
3
|
Нач. отдела
|
Для создания таблицы «Справочник отделов»:
- в окне базы выберите вкладку Таблицы Создать Конструктор и введите следующую структуру (см. рис. …):
|
Имя поля
|
Тип данных
|
Свойства поля
|
Значения
|
|
Код отдела
|
Числовой
|
Размер поля
|
Целое
|
|
|
|
Индексированное поле
|
Да (Совпадения не допускаются)
|
|
Наименование отдела
|
Текстовый
|
Размер поля
|
30
|
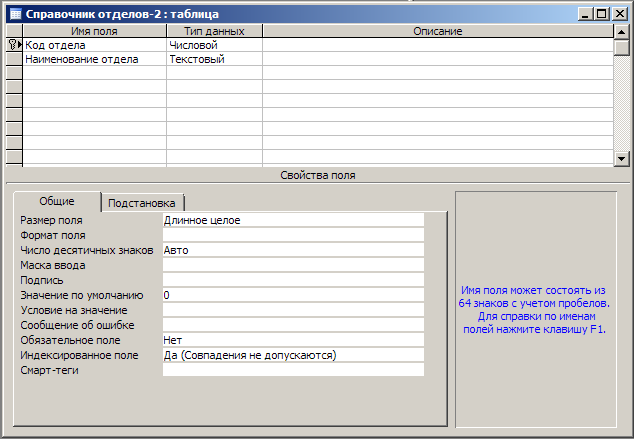
Figure #3: окно Конструктора таблиц. Структура таблицы «Справочник отделов».
Закройте окно Конструктора таблиц и присвойте таблице имя Справочник отделов. Заполните таблицу данными. Нажмите кнопку Открыть и введите данные. Например:
|
Код отдела
|
Наименование должности
|
|
1
|
Управление
|
|
2
|
Бухгалтерия
|
|
3
|
Отдел кадров
|
|
4
|
Цех №1
|
Для создания таблицы «Сотрудники»:
- в окне базы данных выберите Таблицы Создать Конструктор и введите следующую структуру (см. рис. …):
|
Имя поля
|
Тип данных
|
Свойства поля
|
Значения
|
|
Табельный номер
|
Текстовый
|
Размер поля
|
5
|
|
|
|
Индексированное поле
|
Да (Совпадения не допускаются)
|
|
Ф.И.О.
|
Текстовый
|
Размер поля
|
60
|
|
|
|
Индексированное поле
|
Да (Совпадения не допускаются)
|
|
Код должности
|
(мастер подстановок)
Числовой
|
Запускается программа-мастер (источник данных): таблица «Справочник должностей»; выбранные поля: Код должности и Наименование должности
|
|
Код отдела
|
(мастер подстановок)
Числовой
|
Запускается программа-мастер (источник данных): таблица «Справочник отделов»; выбранные поля: Код отдела и Наименование отдела
|
|
Образование
|
|
|
|
|
Стаж работы
|
Дата/время
|
Формат поля
|
Краткий формат даты
|
|
|
|
Маска ввода
|
00/00/0000;0;_
|
|
Адрес
|
Текстовый
|
Размер поля
|
40
|
|
Дата рождения
|
Дата/время
|
Формат поля
|
Краткий формат даты
|
|
|
|
Маска ввода
|
00/00/0000;0;_
|
|
Сведения о сотруднике
|
Поле МЕМО
|
|
|
|
Льготы
|
|
|
|
|
Фото сотрудника
|
Поле объекта OLE
|
|
|
Для поля «Табельный номер» задайте «ключ».
Примечание. Для полей «Код должности» и «Код отдела» выберите Тип данных – «мастер подстановок». Мастер подстановок создает в таблице столбец подстановок, отображающий список значений, которые может выбрать пользователь.
Процесс подстановки происходит в 5 этапов (переход к каждому следующему этапу осуществляется нажатием кнопки Далее). Рассмотрим процесс подстановки на примере поля «Код должности»:
Шаг-1: Создание столбца подстановки. Следует выбрать способ 1-й – объект «столбец подготовки» будет использовать значение из таблицы или запроса.
Шаг-2: Выбор таблицы или запроса. Выбираем таблицу – «Справочник должностей».
Шаг-3: Выбор полей. Выбираем «Код должности» и «Наименование должности».
Шаг-4: Задание ширины столбцов и установление флажка «Скрыть ключевой столбец».
Шаг-5: Задание подписи поля – «Код должности».
Перед созданием подстановки программа выдает запрос на сохранение таблицы. И если ключевое поле не задано, Access предложит пользователю создать такое поле.
Для поля «Код отдела» выберите источник – таблицу «Справочник отделов», и поля – «Код отдела» и «Наименование отдела». После ввода всех полей сохраните структуру таблицы. В данной таблице используются подстановки для полей «Код должности» и «Код отдела» из связанных таблиц, в результате чего (= такой подстановки) тип поля заменяется соответствующим типом из связанной таблицы.
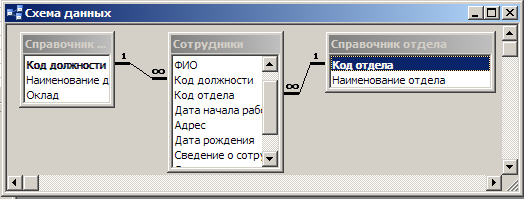
Установка связей между таблицами
Для создания связей между таблицами Access имеет специальное диалоговое окно, которое называется «Схема данных»:
- окно «Схема данных» открывают кликом на одноименной кнопке
 панели инструментов или командой Сервис Схема данных. На дисплее отобразится схема таблиц базы данных и взаимосвязей между ними (см. рис. …);
- Двойной клик мышкой по линии связи между таблицами вызывает на экран диалоговое окно Изменение связей, в котором можно задать свойства образующейся связи.
- Включение флажка Обеспечение целостности данных позволяет защититься от случаев удаления записей из главной таблицы, при которых связанные с ними данные подчиненных таблиц останутся без связи.
- Флажки Каскадное обновление связанных полей и Каскадное обновление связанных записей обеспечивают одновременное обновление и удаление данных во всех подчиненных таблицах при их изменении в главной таблице.
Задание №2. Создание и редактирование форм.
2.1. Создайте форму для таблицы «Сотрудники» с помощью Мастера форм. Для этого:
- Перейдите к вкладке Формы и нажмите кнопку Создать.
- Выберите Мастер форм, а в качестве источника данных выберите таблицу «Сотрудники». Программа-Мастер в режиме диалога «ведет» пользователя к выбранной цели.
- Выберите внешний вид формы: например, В один столбец Далее.
- Выберите стиль формы: например, Международный Далее.
- Задайте имя формы: Сотрудники Готово.
2.2. В результате на экране появится готовая форма для ввода данных. Для удобства ввода данных полученную форму можно подкорректировать, изменив ее внешний вид и добавив кнопки навигации. Все это можно проделать в режиме Конструктора формы (см. рис. …): на вкладке Формы выделите созданную ранее форму «Сотрудники» и нажмите кнопку Конструктор.
2.3. В разделе Заголовок формы разместите элемент Поле со списком  и, следуя инструкциям Мастера, настройте его на поиск сотрудников по ФИО. Для этого надо выбрать такие настройки: Поиск записи в форме на основе… Далее, затем в списке доступных полей выберите поле Ф.И.О. Далее,
PAGE 5
Employee database